


Georgetown Expert Fridge Repair….Tips
A refrigerator is possibly the most common home equipment in every single household, it is likely that you will find this appliance. They, at times malfunction and may need fixing, or at times they need maintenance to prevent them from breaking down. Refrigerator Repair MTService is the best most efficient service to contact in all cases of refrigerator repair or maintenance. We play a key factor in ensuring that both the home and commercial users have fridges that have low electric consumption plus ones that are safer for their health. MTService deals in all the main refrigerator brands as well as sizes. Whether side by side refrigerators, French door fridges, commercial fridges, old generation, new generation among others; the experts will get it fixed. No matter the size, whether the bottom or the top mount refrigerators, we will be able to offer the services needed.
What is the situation with your fridge?
If you own a refrigerator, you ought to know how it works, how to control the temperatures, how to clean it, basics on how to take care of it among other things. These are the basics that will help you notice when your refrigerator starts malfunctioning. The fridge doors have to close well to ensure proper functioning altogether. The motor must be able to operate smoothly. Seeing little details like these will be of great help to help you know when to get help from the appliance masters. The technicians will ensure the fridge completely works and even ensuring no loss of energy through the tiny gaps ensuring maximum energy conservation and food preservation.
Simple Fridge Repair
If you suspect that food does not stay fresh for long in your refrigerator, it is advisable you contact the experts. It may be a very simple problem but require expertise. It is not wise to start fixing the appliance by yourself as you may end up completely spoiling the refrigerator. We suggest you contact Appliance repair Ottawa, and in no time the gasket will be fixed for maximum cooling among other major problems. We have the necessary skills and human resources to bring the refrigerators to its brand new condition, perfectly running and consuming the least energy. It is also advisable to call the technicians even if your fridge is running just for maintenance from time to time this greatly helps in ensuring that the refrigerator does not breakdown. With maintenance, you reduce risks of it malfunctioning saving you time and money. If you ever think you need an expert to check out your refrigerator then give a call to the masters…….from MTService for help or even advice… or LOOK at other helpful tips.
How to Repair a Refrigerator
Fridge repair: Fix the most common fridge problems yourself—and save the expense of a service call!
Problem: Icemaker on strike

Problem: Tiny ice cubes
When an icemaker stops working or produces only tiny cubes, it’s usually because the water supply is partially or completely blocked. To find and fix the blockage, check out the three common trouble spots.
Easy fixes for an icemaker

Photo 1: Remove the icemaker
Remove the screws that hold the icemaker in place. Unplug the wiring harness and remove the icemaker to expose the water inlet tube.
FIRST, check the water inlet tube for ice (Photos 1 and 2). The tube that supplies water to your ice maker can get plugged with ice when the water pressure is low. The trickling water freezes and plugs the tube before it reaches the ice maker.
SECOND, unblock the saddle valve (Photos 3 and 4). Most ice makers are connected to the household water supply by a “saddle” valve. One problem with saddle valves is that the needle hole in the pipe can clog. Fortunately, that blockage is easy to clear once you locate the saddle valve (Photo 3). If you have an unfinished basement, you’ll probably find a tube beneath the fridge that leads to the valve. Otherwise, look under your kitchen sink.
THIRD, replace the water inlet valve (Photo 5). At the back of your fridge, there’s a small electric “inlet valve” that turns the water supply to the ice maker on and off. Before you replace the valve, make sure water is flowing to it: Turn off the water at the saddle valve (Photo 3) and disconnect the supply tube from the inlet valve (see Photo 5). Hold the tube over a bucket and have a helper turn on the saddle valve. If water flows out of the tube, the water supply is fine and chances are the inlet valve is bad. See “Finding Fridge Parts” for help finding a new valve. When the job is done, turn the water back on and check for leaks before you push the fridge back into place.
Caution:
Always unplug the refrigerator before you make any repairs.
Problem: The fridge produces puddles

A leaky refrigerator
The water supply lines that serve ice makers or water dispensers can leak and make pools under the fridge. But a fridge without these features can create water problems too. Every fridge produces water in the form of condensation and melting ice. When the system that deals with this water fails, you can end up with puddles inside and outside of the fridge.
Easy solutions for fridge leaks
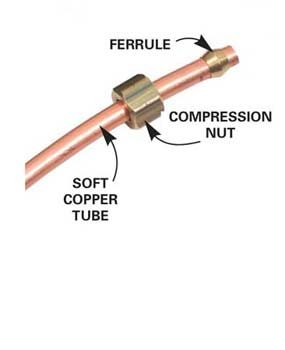
Photo 6: Close-up of leak-prone parts of a compression fitting
FIRST, check the water supply line (Photo 6). If your fridge has an ice maker or water dispenser, pull out the fridge and look for a leak. If there’s a leak at the inlet valve (Photo 5), tighten the compression nuts. If the plastic or copper tube is leaking, replace it. Tubing is usually connected to the saddle valve (Photo 3) and inlet valve (Photo 5) with screw on compression fittings.
SECOND, level the fridge (Photos 7 and 8). Water drains into a pan under the fridge where it evaporates. If your fridge is badly tilted, water can spill out of the pan. Leveling the fridge solves this problem (Photo 7).
THIRD, clear the drain tube (Photos 9 and 10). If the drain tube in the freezer gets plugged, water leaks into the compartment below or onto the floor. To unplug it, first remove the cover panel (Photo 9). In some models, you have to unscrew the floor panel too. Use a hair dryer to melt any ice buildup. Sop away the melt water with a sponge. Then clean up around the drain hole. Blow air through the tube to clear it. Any tube that fits tightly into the hole will work. You can also use a tire pump or air compressor (turn the pressure down to 30 psi).
Problem: Fridge or freezer won’t cool

Freezer failure!
There are lots of malfunctions that can take the chill out of your fridge. One common cause of suddenly soft ice cream or warm juice is a simple loss of electricity. If the light doesn’t come on when you open the fridge door, make sure the fridge is plugged in and check the breaker panel. If the fridge runs but doesn’t get cold enough, chances are one of the following fixes will restore the chill.
Easy solutions for cooling problems
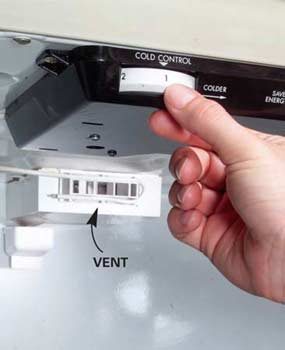
Photo 11: Check the temperature control dial
Adjust the temperature control dial. Also make sure the vents inside the fridge or freezer compartment aren’t blocked by containers.
FIRST, check the thermostat and vents (Photo 11). The temperature control dial inside the fridge is sometimes irresistible to curious kids. Make sure it hasn’t been turned way down. Also make sure the vents in the fridge and freezer compartment aren’t blocked by food containers—these vents supply the flow of frigid air.
SECOND, clean the coils (Photo 12). In order for your fridge to create a chill, air has to flow freely through the condenser coils. On most older refrigerators, these coils are on the backside. Cereal boxes on top of the fridge or grocery bags stuffed behind it can reduce the needed airflow. Most newer refrigerators have coils underneath, where they can get blocked by trash and plugged with dust. Even if your fridge is working fine, you should pull off the front grille and clean the coils every year for efficient operation; do it every six months if you have shedding pets. Long brushes are available at appliance stores for $8.
THIRD, free up the condenser fan (Photo 13). Coils on the back of a fridge create their own airflow as they heat up. Models with coils underneath have a fan to push air through them. Dust buildup can slow the fan; wads of paper or other trash can stop it altogether.
Diagnose and Replace a Bum Refrigerator Circuit Board
If your refrigerator isn’t keeping food cold, the cause could be a burned circuit board or a sticking circuit board relay. Before calling for repair service, try this trick. Unplug the fridge and roll it out. Remove any metal cover plates or cardboard access panels on the back and look for a circuit board. Examine the board for burn marks. If you see any, replace it as shown in Photo 2. Move the press-on connectors to the new board one at a time. Press each connector onto the header pins until it’s firmly seated.
If the board looks good, locate the largest relay on the board (look for the largest rectangular plastic box). Then plug in the fridge (don’t touch any wires!). Tap lightly on the compressor relay to rattle the electrical contacts inside. If the fridge starts, you need a new circuit board.
If there are no burn marks and the tapping doesn’t work, or the compressor makes a humming or clicking sound and then shuts off, the problem may be a relay located on the compressor itself. To learn how to do that fix, see refrigerator compressor repair.
Problem: A noisy fridge

Constant refrigerator noises can drive you nuts
Refrigerator noise comes from either the compressor under the fridge, the condenser fan motor under the fridge, or the evaporator fan motor inside the freezer. Open the freezer door while the fridge is running. If the noise doesn’t get louder when you open the freezer, pull out the fridge. Most refrigerators have a condenser fan motor (Photo 13). Unscrew the back cover and listen—you’ll be able to tell whether the noise is coming from the fan or the compressor. The best cure for a loud compressor is usually a new fridge. To replace the fan motor, remove its mounting screws, unplug it and install the new one.
Easy solutions to refrigerator noises
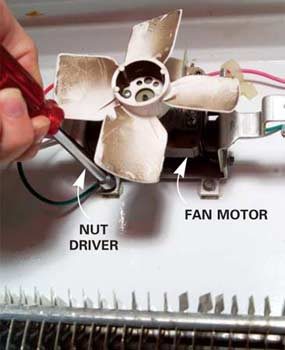
Photo 14: Remove the fan
Unscrew the fan from the rear wall of the freezer and unplug the wires. With some models, you’ll need a socket set or nut driver to remove the fan.
If the sound gets louder when you open the freezer, the evaporator fan motor is the noisy culprit. This motor is easy to replace. Your fan may not look exactly like the fan we show here, but the basic steps are the same (Photos 14 and 15). Start by unscrewing the back cover panel in the freezer compartment (Photo 9). To install the new fan, just reverse your steps.
Finding Fridge Parts
- To get the right part for your refrigerator, you’ll need the model number, which is usually stamped on a tag inside the fridge. If you can’t find it anywhere on or inside the fridge, check your owner’s manual.
- To locate a parts dealer in your area, look under “Appliances, Major, Parts” in the Yellow Pages or online.
- To mail-order parts for any major brand, go to www.sears.com or call (800) 4-MY-HOME.
Don’t Wreck The Floor When You Pull Out The Fridge
Nine times out of ten, you can pull out a fridge without any damage to the floor. But a sideways skid or a grain of sand caught under a wheel can scar any floor—I even managed to scratch the ceramic tile in my kitchen. At the very least, lay down a cardboard runway before dragging out your fridge. For the ultimate floor protection, use 1/8-in. hardboard (at home centers). A pair of shims create a ramp for easier pulling.
Required Tools for this Project
Have the necessary tools for this DIY project lined up before you start—you’ll save time and frustration.
- 4-in-1 screwdriver
- Adjustable wrench
- Level
- Nut driver
Vacuum, long brush, hair dryer
Problem: Fridge not cooling
There are several possible causes when a refrigerator doesn’t keep your milk cold or your ice cream frozen. Before you attempt more complex repairs, try these simple fixes is your refrigerator is not cooling:
- Be sure the fridge is plugged in and getting power. The light should come on when you open the door.
- Check the thermostat to make sure it hasn’t been turned way down by mistake.
- Be sure the vents on the back of the freezer compartment aren’t blocked by boxes of ice cream or frozen vegetables—the vents have to be clear for cold air to circulate.
- Vacuum the coils under or behind the fridge. Clogged coils can cause poor cooling.
- Check to make sure nothing is stuck in the condenser fan and that it spins freely (models with coils on the back won’t have a fan). To do this, unplug the fridge and pull it out. Clean the fan blades and spin the fan by hand to see if it’s stuck (Photo 5 shows the condenser fan location). Plug in the fridge and make sure the fan runs when the compressor is running. If the fan doesn’t run, see Photos 5 and 6, which show how to replace it.
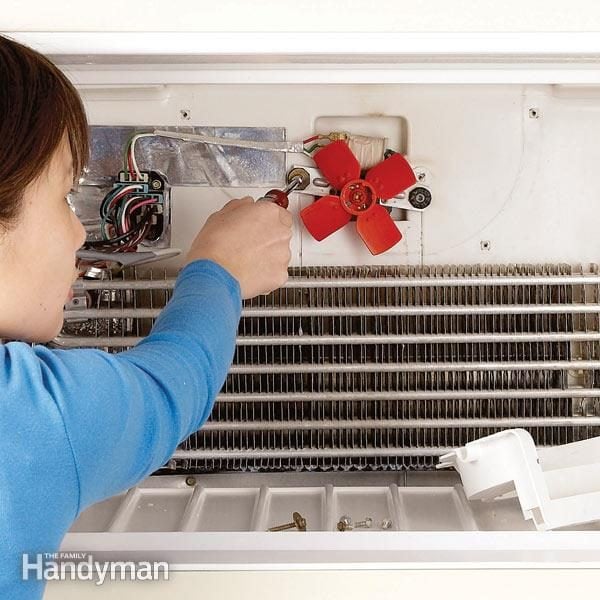
Replace the evaporator fan
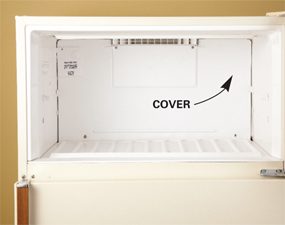
Photo 1: Remove cover
Remove the cover to inspect the evaporator and to access the evaporator fan. The screws may be covered with plastic plugs that you pry out.
Here are some troubleshooting tips to help you zero in on the problem if you notice your fridge not cooling. If you can hear the compressor running but the fridge isn’t cooling, the problem is most likely either frost-clogged evaporator coils or a stuck or broken evaporator fan. Evaporator fans often squeal or chirp when they start to go bad. You’ll know it’s the evaporator fan if the noise gets louder when you open the freezer door. The evaporator coils and fan are located behind a cover in the freezer compartment. Photos 3 and 4 show how to replace the fan if it’s necessary.
If you remove the cover inside the freezer and find the coils completely filled with frost, take everything out of the freezer and fridge, unplug it and let it thaw for 24 to 48 hours. Keep a few towels handy to soak up water that may leak onto the floor. When all the frost is melted away, plug the fridge back in. If it works, the problem may be a defrost timer, defrost heater or defrost thermostat. Replacing these parts isn’t difficult, but figuring out which is faulty requires troubleshooting that we won’t cover here. Call a pro if you suspect a problem with these parts.
Normally the condenser fan and compressor, located near the floor on the back of most refrigerators, come on the back of most refrigerators, come on when the thermostat calls for more cooling. If you don’t hear the compressor running after the door has been left open for a while, it could mean the condenser fan is stuck or worn out or that the relay or compressor is bad.
Replace the condenser fan
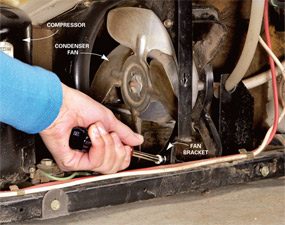
Photo 5: Replace condenser fan
Replace the condenser fan if it’s noisy or doesn’t run. Depending on your fridge, you may have to remove the fan bracket first, and then unscrew the fan from the bracket.
Pull the fridge away from the wall, unplug it and remove the thin panel on the back near the bottom to access the compressor and condenser fan. Next plug the fridge in and wait for the compressor to come on. The fan should also come on. If the compressor runs but the fan doesn’t, or if the fan is noisy, you need a new fan. If neither runs and the compressor is hot, unplug the fridge and point a fan or a hair dryer set to “no heat” at the compressor. Wait for the compressor to cool and try again. If the compressor runs but the fan doesn’t, the fan is bad. Unplug the refrigerator and replace the fan (Photos 5 and 6). If neither runs, then you may need a new relay or compressor. Call an appliance repair technician to find out.
Required Tools for this Project
Have the necessary tools for this DIY project lined up before you start—you’ll save time and frustration.
- Socket/ratchet set
- Wire stripper/cutter
Required Materials for this Project
Avoid last-minute shopping trips by having all your materials ready ahead of time. Here’s a list.
- Evaporator fan and/or condenser fan